Production-ready green screen in the browser
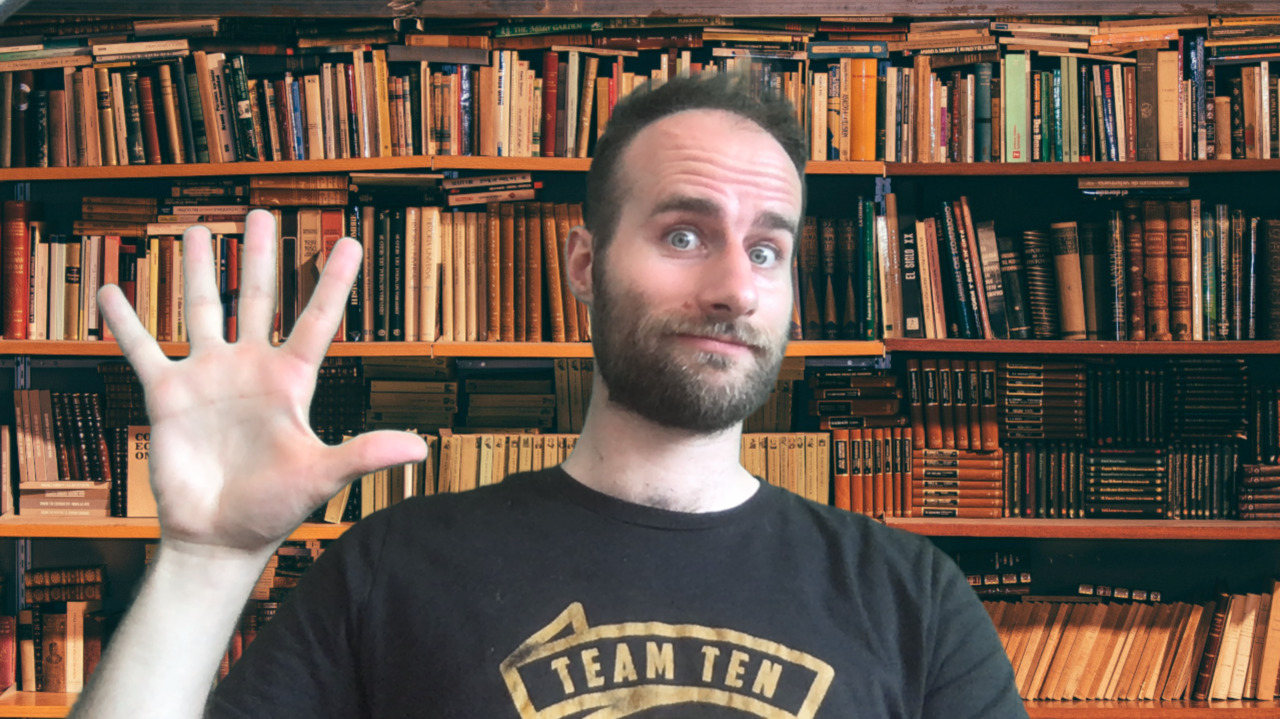
In this post I show a high-quality green screen implementation directly in the browser. It runs in realtime, uses WebGL for efficiency, and uses a high-quality green screen algorithm that beats your Zoom virtual background. Here’s a live demo, where you can adjust the parameters to place yourself in front of a virtual bookshelf:
| Key color | |
|---|---|
| Similarity | |
| Smoothness | |
| Spill |
How does it work? Here’s the basic “pipeline”:
- Get a
MediaStreamwithgetUserMedia - Decode the stream with an invisible
<video>element requestVideoFrameCallbacktells us when a video frame is available- For each frame, copy it to a WebGL texture with
texImage2D - For each frame, set the uniform parameters of a fragment shader from the new texture and the HTML form
- For each frame, redraw a canvas, shaded by the fragment shader
- In the fragment shader, adjust each pixel’s opacity and color based on its closeness to the chroma of the chosen key color
After tweaking the parameters for your own green screen, you should get a reasonable result like this:
This is similar to the green screen pipeline in my previous post,
but with a much better green screen algorithm.
In the previous post,
the green screen algorithm makes the pixel fully transparent
if g > 0.4 && r < 0.4 (where color channels are measured between 0.0 and 1.0).
Otherwise, it makes it fully opaque.
But there are more sophisticated methods to decide how transparent a pixel should be,
and to correct for “color spill” (that is, green light reflected from the subject).
The green screen algorithm above is derived from the Chroma Key filter in OBS Studio. The OBS shader is written in HLSL, but WebGL shaders are written in GLSL. Microsoft have a GLSL-to-HLSL conversion reference, which I just read “backwards”. I also removed some extraneous features from the OBS shader that did not seem to improve quality. This left me with:
precision mediump float;

uniform sampler2D tex;
uniform float texWidth;
uniform float texHeight;

uniform vec3 keyColor;
uniform float similarity;
uniform float smoothness;
uniform float spill;

// From https://github.com/libretro/glsl-shaders/blob/master/nnedi3/shaders/rgb-to-yuv.glsl
vec2 RGBtoUV(vec3 rgb) {
  return vec2(
    rgb.r * -0.169 + rgb.g * -0.331 + rgb.b *  0.5    + 0.5,
    rgb.r *  0.5   + rgb.g * -0.419 + rgb.b * -0.081  + 0.5
  );
}

vec4 ProcessChromaKey(vec2 texCoord) {
  vec4 rgba = texture2D(tex, texCoord);
  float chromaDist = distance(RGBtoUV(texture2D(tex, texCoord).rgb), RGBtoUV(keyColor));

  float baseMask = chromaDist - similarity;
  float fullMask = pow(clamp(baseMask / smoothness, 0., 1.), 1.5);
  rgba.a = fullMask;

  float spillVal = pow(clamp(baseMask / spill, 0., 1.), 1.5);
  float desat = clamp(rgba.r * 0.2126 + rgba.g * 0.7152 + rgba.b * 0.0722, 0., 1.);
  rgba.rgb = mix(vec3(desat, desat, desat), rgba.rgb, spillVal);

  return rgba;
}

void main(void) {
  vec2 texCoord = vec2(gl_FragCoord.x/texWidth, 1.0 - (gl_FragCoord.y/texHeight));
  gl_FragColor = ProcessChromaKey(texCoord);
}
The shader works in the YUV color space,
using the U and V components to measure how far a pixel is from the key color.
If the distance is below a threshold called similarity,
the pixel is fully transparent.
Beyond that, the transparency rises;
the smoothness parameter controls how quickly the transparency rises.
Similarly, the pixel is desaturated to the extent that its chrominance is close to the key color;
this attempts to account for light reflected from the subject.
The spill parameter controls how quickly this desaturation drops off.
Ultimately, this shader defines a pure function from an RGBA pixel to an RGBA pixel. (The OBS shader is a bit more “sophisticated” in that it samples neighboring pixels. However, I removed this, because I don’t think it led to a better result.) Potentially, the implementation could be more efficient by enumerating all possible inputs and outputs ahead of time. This is the approach that Apple encourages when implementing green screen as a CIFilter.
To get started adapting this demo, just view source on this page - you should find the source pretty readable.
This page copyright James Fisher 2020. Content is not associated with my employer.
 Granola